Showing posts with label the walking dead. Show all posts

Sunday, November 2, 2014

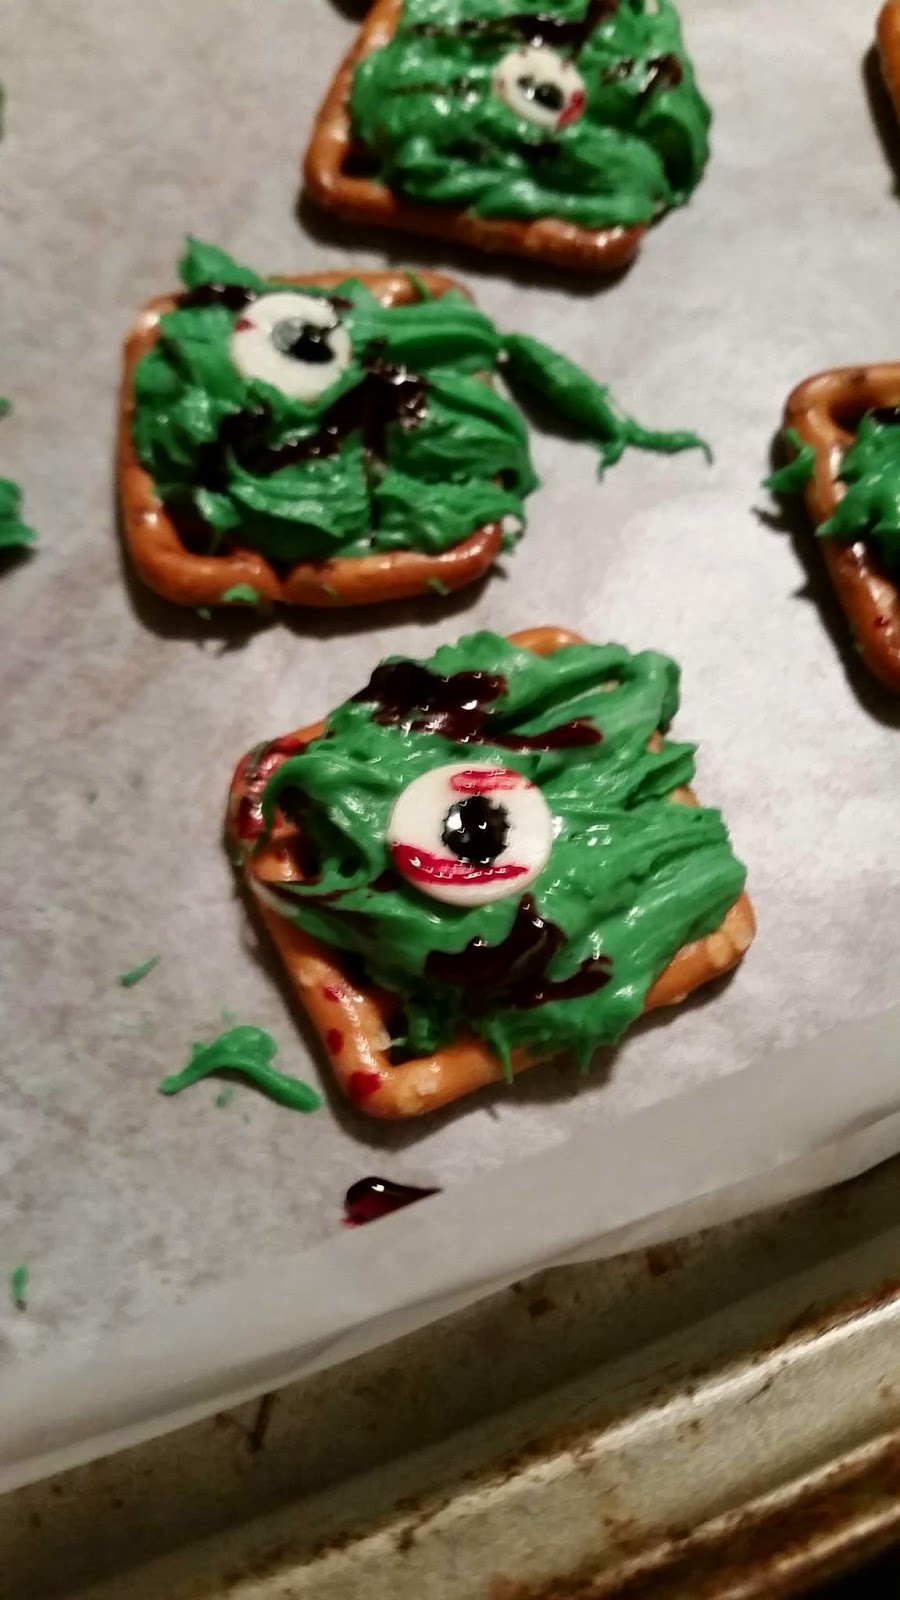
Zombie Bites! A snack for The Walking Dead fans!

Are you a fan of The Walking Dead?! 
Here is a fun snack to make for Sunday night!
ZOMBIE BITES!


You will need: 
White chocolate baking chips
Waffle Style pretzels
Sugar bones (I found my in the Halloween cake items)
Food coloring (I used red, black and green)
 

Other items I used:
mixing bowls
mixing utensils (I used a fork)
toothpicks
cookie sheets
wax paper
microwave

Step 1: Separate a bag of white chocolate baking chips into two bowls (make sure the bowls are microwave safe!)

 
Follow the directions on the chocolate chips package, for timing on how to melt the chocolate without burning it. 

Step 2: while the chocolate is melting away in the microwave, I laid out my pretzels on a cookie sheet covered with wax paper (I prefer it for an easier clean up!)
 
 Step 3: When the chocolate is melted, I added the food coloring. Green to one bowl and red to the other bowl. 


Step 4: I mixed the food coloring in very well, and kept adding more until the chocolate was my desired shades of green and red. When the chocolate was my desired colors, I used my fork to drop a blob onto each pretzel. I started with the green chocolate.


Step 6: before the green chocolate started to harden, I placed an un-melted white chocolate chip upside-down in random places of the green chocolate.  I then took red food coloring on a toothpick and dribbled red over the entire pretzel and chocolate to make it look like blood. I added a small dab of black food coloring to the center of the un-melted white chocolate chip to make it look like an eyeball. 


Step 7: Now onto the red melted chocolate! I did the same process as step 6 for the red as well, but I also used some candy sugar bones for some of them! I also didn't use any extra red food coloring to add blood to these ones, but you totally could if you wanted to! I did however, use a fork to rough up the chocolate a little more on these ones as the chocolate was starting to harden. I was going for more of a human look for these ones, compared to the green ones.


Step 8: place them in the fridge until it is serving time!

Step 9: Take them out of the fridge and enjoy them with other Walking Dead fans and friends!

p.s. these would also be a fun Halloween treat as well!! Heck, even for a scary movie night with friends or the family!

If you recreate these or even make your own version please remember to share a picture with me and your thoughts on them in the comments below! Or tag #CVA on Instagram! I could love to see your creations! 

Sunday, March 30, 2014

Bloody Zombie Bone Smoothies - DAIRY FREE!


 The Walking Dead? Have you ever heard of it?

ohh... I am sure you have. Who hasn't?!

Well James, my brothers, their girlfriends and myself are a little obsessed.
We get together every Sunday and eat dinner and watch the show and after show (Talking Dead) Yes. Every weekend.

For the season premiers and season finales I try to make something TWD related. I have made a giant zombie cookie, I have also made mini zombie cookies. 

Well... Tonight was the season finale. ( so sad.... ) and I wanted to make something new and fun but still TWD related. James and I have been obsessed with our Ninja Blender ever since the day we got it and use it for smoothies quite often. So I thought why not a fun smoothie.

I have dog bone shaped ice trays that I could easily use for frozen yogurt bones. Then the idea just clicked. Blood Smoothies! 

Here is how I made them...

Ingredients:
* ( 1 ) 8 oz bag of frozen raspberries
* ( 2 ) 8 oz bags of frozen strawberries
* ( 4 ) small containers of Silk dairy free vanilla yogurt
* ( 6 ) cups of Vanilla Sink Almond Milk
* ( 2 ) bananas
* ( 1 ) can of chopped strawberries with juice
* bone shaped ice cube trays (i got mine at WalMart in the pet section)
* cups
* straws
* Guests thirsty for some Zombie Blood (EWW... ACTUALLY.. HAHA)

Bone Directions: 
1. TAKE 2 OF THE YOGURT PACKS AND EMPTY THEM INTO A BOWL
2. OPEN THE CAN OR STRAWBERRIES AND MIX A LITTLE INTO THE YOGURT, BUT DON'T COMPLETELY MIX IT UP. just MAKE A RED BLOODY LOOKING SWIRL THROUGH THE WHITE YOGURT
3. PUT ABOUT A SPOONFUL ( OR 2 ) INTO EACH BONE OPENING OF THE ICE CUBE TRAY
4. PUT THAT IN THE FREEZER FOR A FEW HOURS ( i LEFT MINE IN OVER NIGHT )

Smoothie Directions:
1. MIX THE FROZEN RASPBERRIES, FROZEN STRAWBERRIES, BANANAS, OTHER 2 PACKS OF YOGURT AND VANILLA ALMOND MILD TOGETHER IN A BLENDER
2. BLEND UNTIL SMOOTH
3. ADD MORE almond MILK IF NEEDED
4. YOU CAN EVEN ADD A LITTLE BIT OF THE CANNED STRAWBERRIES AND JUICE BUT SAVE SOME OF THE JUICE!
5. WHEN BLENDED SMOOTH, STOP BLENDER AND POUR INTO YOUR CUPS
6. TAKE A FROZEN YOGURT BONE AND DIP IT IN THE LEFT OVER STRAWBERRY JUICE, SCOOPING UP A LITTLE BIT OF EXTRA JUICE
7. PLACE THE BLOODY LOOKING YOGURT BONE INTO THE SMOOTHIE STICKING ABOUT HALF WAY OUT. the SCOOPED UP STRAWBERRY JUICE WILL PUDDLE AROUND THE YOGURT BONE TO MAKE IT LOOK BLOODY
8. ADD A STRAW AND SERVE!

Are you a zombie OR Walking Dead LOVER?
take this to your next scary movie night or Walking Dead get together!
This is even a fun idea that I might use for Halloween this year!


Monday, February 17, 2014

The Walking Dead Canvas - DIY

My brothers girlfriend is a HUGE Walking Dead fan! ( but hey.. who isn't?!) 

She has been to multiple Comic Con shows in the past year or two. 

Her Birthday was yesterday, and I wanted to make her something special. I was playing on Facebook the other day, looking at picture after picture of her with all of the Walking Dead stars and BAH-BAM! I got an idea! 

I was a little skeptical because I have never actually tried this technique, however... I always tell myself "you;'ll never know if you don't try" 

So I got to printing the pictures! 
I printed each picture out on plain ol' computer paper - then I cut each picture out. When all the pictures were cut and trimmed to their perfect sizes, I took a 8x12 canvas from Hobby Lobby, and I coated it with Mod Podge. 

Before the Mod Podge started to dry I quickly and neatly placed each picture FACE DOWN on the canvas. (Face down means Color printed side down) ((like the picture in the top left corner below) I used a scrap of cardboard to get out as many air bubbles as I possibly could. 

I then let that canvas dry for over 24 hours. 

After a day, when I knew it was 100% dry, I got a water bottle and an old wash rag... I got part of the wash rag wet and began to very gently rub away the paper of the pictures. BE VERY CAREFUL! If you rub too much or too hard in one spot, the ink WILL come off the canvas! If you are careful, gentle, and take your time... the paper will rub right off the canvas and leave the ink on the canvas. This making any sense?! 

This technique makes the canvas and pictures look old and vintage (which I really really like!) 

After I was finished removing all of the paper... I put a thick coat of Mod Podge over the entire Canvas and all of the pictures! After that coat of Mod Podge dried... I got out my black acrylic paint and very sloppily painted a boarder around each picture. 

I wanted it to look somewhat messy because of the whole 'Walking Dead + Zombie' thing. They aren't exactly the cleanest, well put together creatures.  

I let the black boarders dry and then took red acrylic paint and painted the words "DON'T OPEN DEAD INSIDE" which if you are a Walking Dead fan, you should remember that from Season 1! 

I let the words dry and I put another coat of Mod Podge on, let it dry and then it was time to sign the back with a lovely Happy Birthday message and wrap it up!


I gave this to her yesterday when I saw her and she seemed to love it! My brothers thought it was great also and I was pretty proud of it! It was fun to make and I enjoyed learned and experimenting with a new ink transfer technique!

 It really wasn't that bad... 

go ahead! Give it a try!