Showing posts with label food. Show all posts

Sunday, November 2, 2014

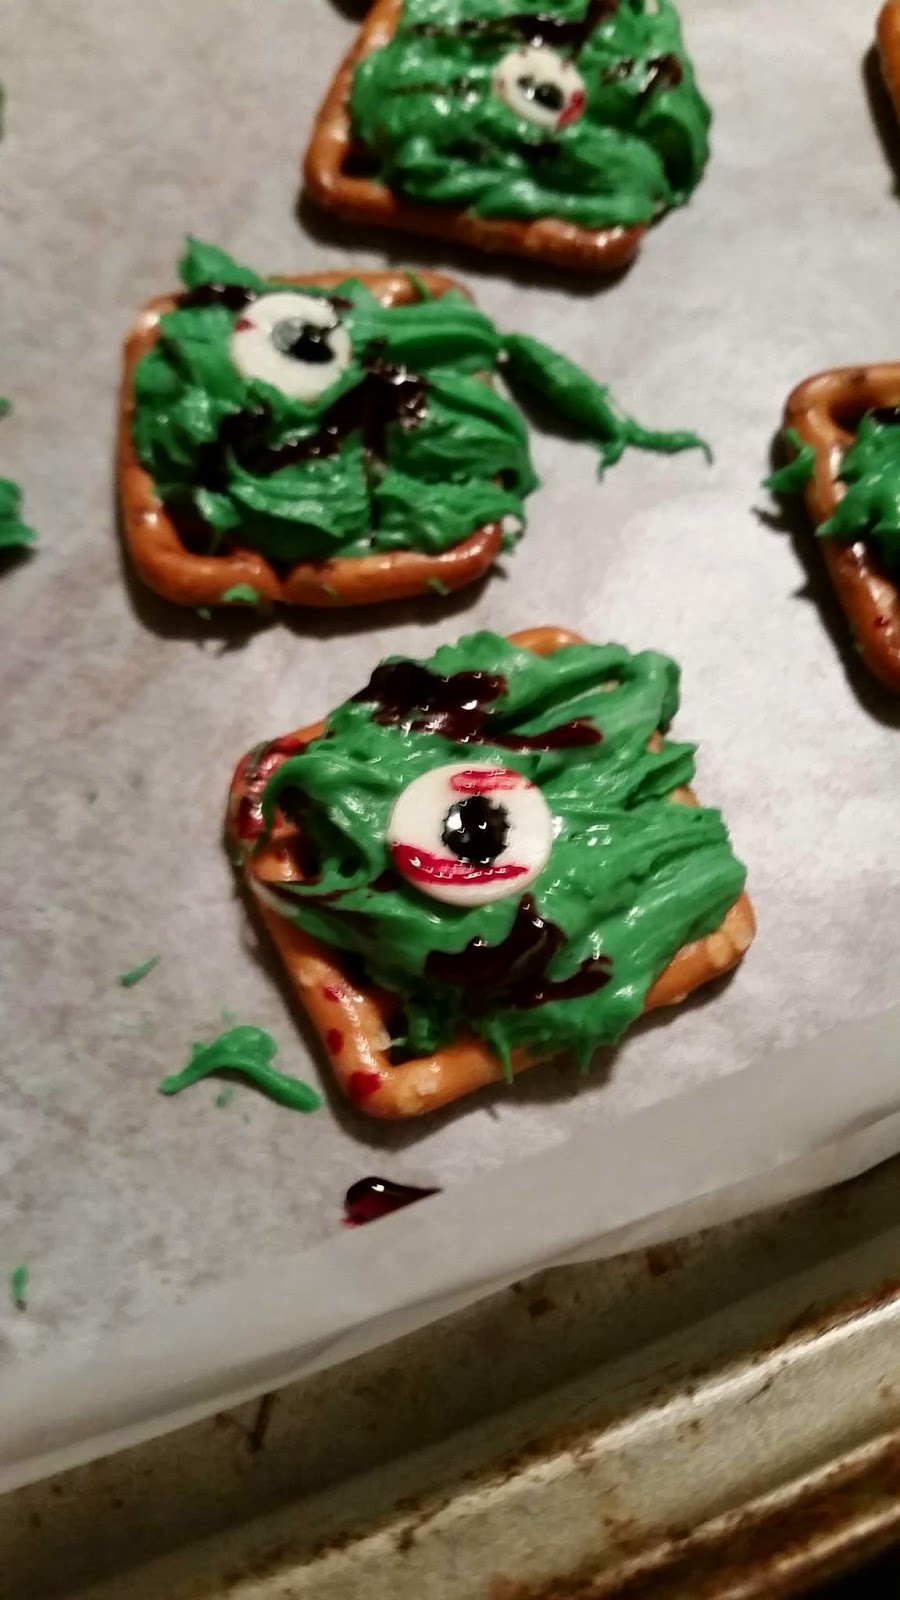
Zombie Bites! A snack for The Walking Dead fans!

Are you a fan of The Walking Dead?! 
Here is a fun snack to make for Sunday night!
ZOMBIE BITES!


You will need: 
White chocolate baking chips
Waffle Style pretzels
Sugar bones (I found my in the Halloween cake items)
Food coloring (I used red, black and green)
 

Other items I used:
mixing bowls
mixing utensils (I used a fork)
toothpicks
cookie sheets
wax paper
microwave

Step 1: Separate a bag of white chocolate baking chips into two bowls (make sure the bowls are microwave safe!)

 
Follow the directions on the chocolate chips package, for timing on how to melt the chocolate without burning it. 

Step 2: while the chocolate is melting away in the microwave, I laid out my pretzels on a cookie sheet covered with wax paper (I prefer it for an easier clean up!)
 
 Step 3: When the chocolate is melted, I added the food coloring. Green to one bowl and red to the other bowl. 


Step 4: I mixed the food coloring in very well, and kept adding more until the chocolate was my desired shades of green and red. When the chocolate was my desired colors, I used my fork to drop a blob onto each pretzel. I started with the green chocolate.


Step 6: before the green chocolate started to harden, I placed an un-melted white chocolate chip upside-down in random places of the green chocolate.  I then took red food coloring on a toothpick and dribbled red over the entire pretzel and chocolate to make it look like blood. I added a small dab of black food coloring to the center of the un-melted white chocolate chip to make it look like an eyeball. 


Step 7: Now onto the red melted chocolate! I did the same process as step 6 for the red as well, but I also used some candy sugar bones for some of them! I also didn't use any extra red food coloring to add blood to these ones, but you totally could if you wanted to! I did however, use a fork to rough up the chocolate a little more on these ones as the chocolate was starting to harden. I was going for more of a human look for these ones, compared to the green ones.


Step 8: place them in the fridge until it is serving time!

Step 9: Take them out of the fridge and enjoy them with other Walking Dead fans and friends!

p.s. these would also be a fun Halloween treat as well!! Heck, even for a scary movie night with friends or the family!

If you recreate these or even make your own version please remember to share a picture with me and your thoughts on them in the comments below! Or tag #CVA on Instagram! I could love to see your creations! 

Tuesday, July 22, 2014

Frozen Yogurt Cones - DIY


This is such a delicious... healthy... easy.... fun treat!
 I think it is perfect for a hot summer day, or even as dessert. I know that I have my moments where I am just craving ice cream or something else sweet, and this way I get my satisfaction & its not that unhealthy!

Here is my shopping list!
  • Waffle Cones (I bought Keebler brand)
  • Light & Fit Greek Yogurt
  • Nature Valley Protein Granola
  • Blueberries
  •  Raspberries
  • Strawberries
Here is what I did to make these:
  1. place waffle cone into a bowl or glass. (you want the bowl or glass to hold the cone upright)
  2. in a bowl, mix together some yogurt, fruit and granola
  3. scoop the mixture into the waffle cones, almost all the way to the top
  4. sprinkle some granola and fruit on top
  5. place in freezer for 2-4 hours. 

This treat was so simple & quick to make. 
You can really be creative with this healthy snack..

Note: I did make another batch of these and left them in the freezer over night... I personally think the yogurt got too hard and frozen. When I did my 1st batch and only left them in the freezer for 2 hours, it was almost a perfect frozen yogurt consistency.  

Comment a picture below if you try these! I would love to see what toppings you choose!

Friday, July 18, 2014

Honey Nut Turkey Rice

Here is a quick and easy 4 ingredient recipe that I through together tonight. Like I said, it was very easy & very quick. Nothing better than having a meal be ready like that!


generated by  Creating Virginia Anne
The husband & I really enjoyed it. 
You cold also add some seasonings to it if you really wanted to!
But I suggest trying it before you add them, because it has a lot of great natural flavors already!

Sunday, March 30, 2014

Bloody Zombie Bone Smoothies - DAIRY FREE!


 The Walking Dead? Have you ever heard of it?

ohh... I am sure you have. Who hasn't?!

Well James, my brothers, their girlfriends and myself are a little obsessed.
We get together every Sunday and eat dinner and watch the show and after show (Talking Dead) Yes. Every weekend.

For the season premiers and season finales I try to make something TWD related. I have made a giant zombie cookie, I have also made mini zombie cookies. 

Well... Tonight was the season finale. ( so sad.... ) and I wanted to make something new and fun but still TWD related. James and I have been obsessed with our Ninja Blender ever since the day we got it and use it for smoothies quite often. So I thought why not a fun smoothie.

I have dog bone shaped ice trays that I could easily use for frozen yogurt bones. Then the idea just clicked. Blood Smoothies! 

Here is how I made them...

Ingredients:
* ( 1 ) 8 oz bag of frozen raspberries
* ( 2 ) 8 oz bags of frozen strawberries
* ( 4 ) small containers of Silk dairy free vanilla yogurt
* ( 6 ) cups of Vanilla Sink Almond Milk
* ( 2 ) bananas
* ( 1 ) can of chopped strawberries with juice
* bone shaped ice cube trays (i got mine at WalMart in the pet section)
* cups
* straws
* Guests thirsty for some Zombie Blood (EWW... ACTUALLY.. HAHA)

Bone Directions: 
1. TAKE 2 OF THE YOGURT PACKS AND EMPTY THEM INTO A BOWL
2. OPEN THE CAN OR STRAWBERRIES AND MIX A LITTLE INTO THE YOGURT, BUT DON'T COMPLETELY MIX IT UP. just MAKE A RED BLOODY LOOKING SWIRL THROUGH THE WHITE YOGURT
3. PUT ABOUT A SPOONFUL ( OR 2 ) INTO EACH BONE OPENING OF THE ICE CUBE TRAY
4. PUT THAT IN THE FREEZER FOR A FEW HOURS ( i LEFT MINE IN OVER NIGHT )

Smoothie Directions:
1. MIX THE FROZEN RASPBERRIES, FROZEN STRAWBERRIES, BANANAS, OTHER 2 PACKS OF YOGURT AND VANILLA ALMOND MILD TOGETHER IN A BLENDER
2. BLEND UNTIL SMOOTH
3. ADD MORE almond MILK IF NEEDED
4. YOU CAN EVEN ADD A LITTLE BIT OF THE CANNED STRAWBERRIES AND JUICE BUT SAVE SOME OF THE JUICE!
5. WHEN BLENDED SMOOTH, STOP BLENDER AND POUR INTO YOUR CUPS
6. TAKE A FROZEN YOGURT BONE AND DIP IT IN THE LEFT OVER STRAWBERRY JUICE, SCOOPING UP A LITTLE BIT OF EXTRA JUICE
7. PLACE THE BLOODY LOOKING YOGURT BONE INTO THE SMOOTHIE STICKING ABOUT HALF WAY OUT. the SCOOPED UP STRAWBERRY JUICE WILL PUDDLE AROUND THE YOGURT BONE TO MAKE IT LOOK BLOODY
8. ADD A STRAW AND SERVE!

Are you a zombie OR Walking Dead LOVER?
take this to your next scary movie night or Walking Dead get together!
This is even a fun idea that I might use for Halloween this year!


Monday, February 3, 2014

uiltfree Dessert

 I actually made these desserts for Superbowl... but then the idea popped into my head... VALENTINES DAY! This is a great way to enjoy a nice and pretty dessert on Valentines day with the ones you love! And it is so quick and simple!

All it is is fresh fruit, bananas, blueberries, raspberries, blackberries, and strawberries; with light and low fat chocolate syrup drizzled over it!

I sometimes take it an extra step and top it with light whipped cream!
mmmmm...

My mouth is watering just thinking about it!

There are so many ways you can present this dessert also, it was just an at home dessert for us and Brian this time so I just used a normal clear drinking glass. However, you could use a pretty plate or fun martini glass or something else creative!

Just have fun with it and enjoy your Guiltless Valentines Dessert! 


Friday, January 31, 2014

❅ ❅ Easy Edible Snowmen ❅ ❅


I usually get annoyed when I am trying to browse Facebook and people keep sharing random posts...
However, When I saw this fun idea on my news feed I couldn't help but take a mental picture!

Every year we have a family winter festival at my grandmas house by the lake. 
I told my mom that I was going to be bringing a dessert, and I thought these would be perfect for the winter theme of the festival!

I didn't open or save the original Facebook post that I saw, like I said earlier, I just took a mental picture... so....
 
  Here is what I used:  

❅ White powered donuts
black gel frosting in a squeeze tube
candy corn
white cupcake papers

I placed a donut in each cupcake paper, and then shoved a candy corn in each donut hole. 
I then took the black gel frosting (in a squeeze tube) and make two eyes and a mouth (4 dots) on each donut! 

These were so fun and easy to make, and I know they are going to be a huge hit at the winter festival!

Simple. Cheap. Easy.
and DELICIOUS!

Friday, January 24, 2014

Taco Balls - Foody Friday - Recipe


James and I are always trying to find or think of quick but yummy lunches and snacks. WE love to take a ton of ingredients and mix them together to see how they turn out. Well this is the case for us. James is part Mexican. I love Mexican food, As does he. We wanted tacos but did not have tortillas, we were both at home in our comfy clothes just relaxing so neither of us wanted to go to the store. I opened the fridge and saw that we had a few packs of crescent rolls. LIGHT-BULB! then they were born... and delicious! Taco Balls...

Ingredients:
* 1 pound of hamburger meat
* 1 packet of taco seasoning
* 2 rolls of crescent rolls
* sour cream
* shredded Cheese
* salsa

Directions:
1. brown your hamburger meat.

2. follow the oven preheating directions on the crescent roll packages
3. drain your hamburger meat
4. add taco seasoning
5. roll out each crescent roll
6. place 1-2 tbsp in the center of each crescent roll
7. sprinkle cheese on meat (if desired)
8. fold over all edges of crescent roll around meat and cheese
9. pinch all edges closed
10. sprinkle a dash of cheese on top to add a pretty look and some extra flavor
11. put in oven until golden brown or cooked to your personal preference
12. take out - let cool a little
13. top with sour cream, lettuce, salsa, guacamole, or any other toppings you prefer
14. ENJOY!


If you try them please share your experience! And I would love to hear of any adjustments or additional toppings added to your version!

Wednesday, December 25, 2013

DIY Meat Rub { Beef }

For the guys of my family this year, I made them little baggies of seasoning for beef. I wanted to do big jars of them for each male of the family, however, to be completely honest, it was just way to expensive. So a little one meal bag is what they got. I made cute little labels and everything! :D

I just mixed all the ingredients together and put about 4 tbsp in each baggy, then attached a tag and used a twisty tie to close it.


Beef Rub Ingredients:
{ Recipe I got from my school pal }
  
 And here is a picture of the basket I held them in while I passed them out.

Tuesday, November 12, 2013

Little container with a lot of taste!

Being at school a lot lately, has forced me to buy snacks from the school cafeteria. I have a strong love for hummus and I couldn't believe my eyes when I saw this deliciously looking duo! How thoughtful and perfect?! The container is split into 2 parts the top has crisp pretzel chips in it and the bottom is foiled shut with hummus below! My school has a little mini fridge fill of these! And to be honest I wish I could just buy the whole fridge! I wish I could find these in bulk some where! I buy them all the time from school now and I love that it's actually a healthy treat! ;)


Xoxo Renae

Wednesday, November 6, 2013

Fall <3


Eeeekk!! 
My first caramel apple of the season!!!! I absolutely love caramel apples, however I only eat them in the fall because 1. Its a fall food (at least to me) and 2. It gives me a treat to look forward to in the fall! This was so sweet and juicy and perfect! Haha I just had to share it!

Wow what a pointless post..... haha

Xoxo Renae

Sunday, November 3, 2013

Yummy Tummy Pumpkin Seeds


One of my favorite parts of fall + Halloween is eating the seeds after the carving of the pumpkin is done! 

For these seeds, I melted a spoonful of butter + brushed it on, quickly coating each seed.
Then I sprinkled garlic powder + salt on them.
I popped them in the oven at 250 degrees for about an hour + TAH-DAH!!

Delicious! 

Thursday, October 10, 2013

DIY homemade doggy froyo

Here is a quick and easy treat for your four legged furry friend! :)
Our German Shepherd is a hyper and fun loving puppy but he has a sensitive stomach sometimes, so when it comes to treats we try to be easy on his tummy.

Here are the ingredients...
1 1/2 cup peanut butter
1 cup Greek yogurt
1 banana

I mashed up a banana, and mixed it in with Greek yogurt and peanut butter!

I bought these cute bone shaped silicone trays at Wal-Mart a few months ago, they were with all of their other ice trays.
 
I then took the mixture and put it in a icing tube, and squeezed the perfect amount into each bone opening.I tried a spoonful at first, but it got too messy. Using the icing tube worked perfectly!


Once they were all full, I put them in the freezer over night. 
The next morning! TA-DA!!! Doggy FROYO!
 

Harlem loved them!! They lasted a while, and whenever I walked to the freezer, Harlem would jump up and follow me! I recommend these to anyone and every with a dog! Easy, fast, cheap, and worth it all!
 

Such a cutie, and such a happy boy!
He sure loves his doggy froyo!

Friday, August 23, 2013

Yummy + Easy DIY Sea turtles

I saw this recipe online somewhere, A LONG TIME AGO and I couldn't remember the address to share. But I finally was sick and tired of our normal super unhealthy snacks, so I decided to make these. I paired up 5 whole almonds, pointing the points out on some of them, then I just clumped some together on wax paper. haha. (I got lazy)
 
 
Using semisweet baking chocolate chips, I melted a handful in the microwave, and then just plopped a spoonful on each mound of almonds.
 
 
After they all had a chocolate "shell" I put them in the fridge for about an hour, and then they were ready to snack on! We actually ended up having some company over the night I made these, and everybody loved them!
 
I know that they are not fruit or veggies, so they are not the healthiest, but they are better than a candy bar, or better than going to the ice cream shop on the corner. (Which we seem to do a lot)
 
They were super easy and they are delicious!
I will defiantly be making these quite often!

Thursday, August 22, 2013

Chocolate filled raspberries --> quick & easy snack!

I just simply filled up my frosting tuber with melted semisweet baking chocolate, and after I washed the berries, I injected each berry with a squirt of chocolate.
 
 
I then placed the berries in a round cake pan on a small piece of wax paper.
Then placed the pans in the fridge to let the chocolate harden.
 
 
Within an hour, the chocolate was hardened, and the raspberries were ready to eat!
 
 
Just my personal opinion, and a few opinions of some family and friends that ate them.... AMAZING!!
 
I defiantly suggest to try these to anyone and everyone!