Showing posts with label love. Show all posts

Saturday, October 1, 2016

DIY Scarecrow bottle - Fall Decor - Upcycle + Recycle

 
I love to bring my grandmother homemade gifts whenever we go to visit her. I also love to be at her house and to be able to look around and see all of these DIY memories I have made and get to share with her. <3 
 
This DIY is so simple. I took an empty wine bottle, painted it a light brown/tan color. While I was waiting for the paint to dry, I cut a piece of foam board to look like a donut that would fit around the top of the bottle, to make the hat. I hot glued some fake straw that I purchased at the local dollar store, around the neck of the bottle as the scarecrows hair. Following that step, I took twine and used my hot glue gun to glue it to the foam donut. When I was finished doing that, I slid the foam donut over the top of the bottle and pushed it down as far as I possibly could. I then took more twine and glued it to the top of the bottle to finish off the look of the hat. I had a roll of rhinestone ribbon that I used as the top of the hat. However, you could easily finish it off with twine, or any other kind of ribbon. I then took some more fake straw and glued it to the base of the bottle, with the loose ends pointing up, before I glued some twine around the bottom of the bottle, and used some more of the rhinestone ribbon around the base; symbolizing his shirt. I added a fun twine bow, just to be cute. My last step was the scarecrows face. I used Halloween googly eyes from the Dollar Tree, and painted on the rest of his face, using pink, orange and black paint. The fun part about his face is that you can be so creative and make any kind of face you want to. I did a simple happy face because after all this is a gift for my 90 year old grandmother.
 
This was such a fun and easy upcycle and recycle project to do. Please share a picture in the comments below if you recreate this project! I would love to see them!
 
Until next time... xoxoxo

Sunday, October 5, 2014

Anniversary Gift Basket & Boquet! (perfect gift for any man!) DIY

The hubby and I have been married for 2 years! 
Gosh, I can almost not believe it! It honestly feels like just yesterday I walked down that isle towards him. 

Well this year, we decided to keep it low key, and just spend the day together as a family. We actually went to a local museum and spent the entire day there just the two of us! It was perfect!

Anyways... of course I can't not make anything for him, so I put together this MAN BASKET for him. 

I included some of his favorite things, such as:
 Arizona Sweet Tea
Hunting items (face cover, vest and scent a way items)
Candy
Slippers
Slim Jim


I wrote out how long we have been married for, in years, months, weeks and days. I attached it to a basket from the Dollar Tree with twist ties. 
It was simple and he loved it because it was from the heart and full of some of his favorite things!

I also made him a Marriage Doesn't Suck bouquet! Because we are MINT TO BE! Corny but so cute, right?! ☺

His most favorite suckers around this time of the year are the caramel apple suckers. So I bought a huge bag of them and a piece of floral foam from the Dollar Tree. I also bought a giant bag of Wint-O-Green Life Savers, and Andes mints (more favorites of his) and used an old giant pickle jar that I had washed an put aside for a random DIY. 

 
I stuck the suckers into the floral foam that I duct taped to the lid of the pickle jar. I fanned them out so look somewhat like a bouquet. I then took the mints (both kinds) and mixed them up inside of the jar. I placed the lid on and taped on my homemade signs.
 
I wrote out 
"TO A MARRIAGE THAT DOESN'T SUCK!" 
and 
"BECAUSE WE ARE MINT TO BE!"


I had these waiting for my amazing husband this morning when he woke up, and he loves them! Not to mention I love them too because I also get to snack on them! hehe

I know that some men can be hard to get gifts for, or to make things for. This is perfect because you can fill it with their favorite items and use their favorite mints and candies! It was fairly cheap and very easy to make!

Please post pictures of your creations in the comments below if you make this. I would love to see them! You can also tag #CVA on Instagram!

Now I am going to spend the rest of the evening with my hubby

Monday, March 10, 2014

Personalizing Your Space - DIY


I am in love. and I love love. I am proud of my relationship and of the man I am spending forever with. In our bedroom, we had a random, funny shaped wall that was empty and I really just wanted to put up something big.. but simple. 

I then remembered that in our place previous to this my mom and I had made these letters for our bedroom while James was away on a fishing trip. It was a surprise for him to come home to. He loves it by the way! Any-whoo... I knew I had them somewhere so I started searching. I FOUND THEM! tah-dah!

Here is how my mom and I made these...

We went to Joannes Fabric store and purchased a GIANT J and a giant R. I also bought the word 'AND' in smaller cardboard letters. I purchased some maroon and white spray paint, and from Michael's I bought two wooden words in cursive "dream" and "love". 

As soon as we got home we got to painting. We started off my spraying all of the letters with a coat of maroon spray paint, because we thought they might need 2 or more coats. While the first coat of paint was drying I spray painted the cursive words love and dream with white. 

We let those dry. The words ended up needing 2 coats of paint and the letters I did 3 coats, just to make sure we didn't miss a spot. 

When all of the letters were dry, we took a hot glue gun and carefully glued one word onto each giant letter. ( as you can see in the pictures above and below ) 

The giant letters came with hooks on the back, however the smaller letters did not. I hung the 2 giant letters with nails ( like you would hang a normal picture ) and I used 2 3M removable frame hanger tabs for each of the smaller letters. that way I can easily remove them ( to clean them or whatever )

Because this craft was done a little while back, I don't remember the exact prices but I am positive that it was under $40. which isn't bad at all! compared to our standard sized air vent in the top picture, you can clearly see that those letters are gigantic!

Do you have an empty wall that you want to personalize?
Try this idea and please feel free to share it with me! I would love to see it!


Monday, March 3, 2014

I have a 'Monster' Crush on you!

James is a big Monster drinker... like almost daily... well for the work trip that he is taking soon. I bought him a 4 pack of monsters to put in his suitcase. But before I packed them... without him knowing I opened them and taped a cute message around one of the cans. I am excited for him to open this at his hotel and find this fun little and simple surprise!

Sunday, March 2, 2014

Scrapbooking #1

I have been on a major scrapbooking kick lately! On a roll I guess.. haha! I have a TON of pictures printed that are just sitting in a box. So slowly but surely I will get them all scrapbooked and lookin' good! I just wanted to share a few of the ones I have completed recently. A variety! I figured I would share them on here, maybe for a few layout ideas. I went for a very simple layout plan on all of them. Minimal stickers and fun background pages! I purchased most of the background pages from Walmart. I will do a post in the next few days specifically on the paper packets I bought from Walmart.


I am currently working on more and will share them soon!


Saturday, February 1, 2014

Valentines Day Gift Ideas


I don't really know what I am going to do for James for Valentines day yet this year. I have a few small ideas but nothing solid.... This will be our 11th time spending valentines day together! We both aren't very big into spending a ton of money on huge presents but we are very big into spending the day together and sharing our love. ♥ ( even though we do that everyday.. not just February 14th! ) 

I always try to make James something or get him some of his favorite drinks and snacks. 
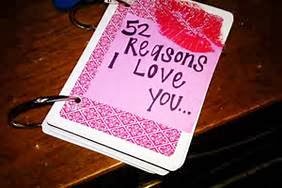
One year I made the "52 Reasons I love you..." out of an entire deck of cards! (similar to the one below) I also made him "The ABCs of us" book for our anniversary, however it is full of love and straight from the heart, so it would be a great valentines gift!


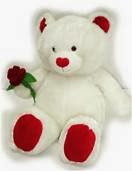
I have also bought him and have received from him stuffed animals... flowers... chocolates.... and jewelry! These are all great gift ideas! And can be a variety of different prices! 
(which is good for all budgets!)


I have given socks, boxers, blankets, tools, games, movies, books and so much more...
 I have received cookies, cakes, cards, socks, pillows, candy, electronics....

But the truth is....

No matter what you buy or make, the best valentines day gift you can give or receive is unconditional love. ♥ From family, friends or your significant other. I don't think Valentines day is just for couples.... to me its just an additional day full of love. 

Saturday, January 4, 2014

2013 Memories Ornament


2013 was full of amazing memories for us.  Hunting. Traveling. Exploring. Laughing. Crying. Crafting. Loving. Living. It was just amazing.

We decided to end the year with making a "Memories Ornament" We simply just took a plain silver ornament off of our Christmas tree, and wrote on it with a sharpie. We covered with it our favorite memories from 2013.

We plan on doing this every year from now on.
Think about it...
Wouldn't it be cool 20 years from now to look back at all the memories written all over the Christmas tree!? 

I think so!

I also love starting new traditions! ☺


Sunday, December 29, 2013

EASY Picture Board

 
I had a black foam board laying in my craft room so since James had to work today I decided to play with it. I used some of my favorite pictures that I had already printed out, and some mod podge :) I first set out all the pictures where I wanted them, then just simply glued them down.
 
I used the Velcro 3M removable tabs to hang it up in our hallway upstairs. James was excited when he came home from work and he loved it!
 
So easy, and now I cant wait to make a few more! We have some empty wall space that I was trying to figure out what to do with.
 

Wednesday, December 25, 2013

Merry Chrismas!


I hope you all have a wonderful holiday and are safe this season! xoxoxoxo

Wednesday, December 18, 2013

Present Idea - DIY Date jar


 Every year I buy James gifts, but because I love crafting so much, I also try to make him a few things as well. Here is one gift I have made him this year... A DATE JAR! 
Even though we always find adventures and we ALWAYS have fun together, I think that sometimes it will be fun and spontaneous to just pick a date out of a jar and do it! Sounds like a great time, right?!

I had a clear vase with a lid in my candy buffet box from the wedding, so I washed it out and cleaned it up, then I just used black scrap-booking stickers to label it "DaTe JaR" So easy! (and cute!)

I went to Hobby Lobby and bought a pack of Popsicle sticks (the wider ones) and I just used a black sharpie to write a date idea on each one. I believe there are about 150-200 sticks and dates in this jar.

It only took me about a half hour to think up and write out each date idea and then just drop the stick into the jar. 


Some of the Date Ideas I used are:
- Coffee Date -Sushi Date - She picks a movie -He picks a movie -Hold hands and walk around a mall - Netflix night -Camp out in the backyard -Day long road trip - Rollerblading -  Fishing - Cuddle Date! - Chinese Food - Chili's - Leon's - Movies - and many many more! If you need some more ideas, feel free to ask and I will share more! 

I have this wrapped up and under our Christmas tree waiting for him!
This is also a great Valentines Day present, or anniversary gift that is easy and it doesn't cost a lot of money!

Thursday, December 12, 2013

DAY 11: Clay Word Ornaments


 I have been wanted to make chrome looking word ornaments for a little while now. So today I broke out some clay I have had and preheated the oven. I usually don't like baking clay, because it stinks and because the oven sometimes stinks afterwards. And ALSO I have heard a few times that it isn't healthy to breath in the fumes. But I had this clay already (before I heard that) and I really didn't want it to go to waste. (shhh don't tell) I made a few rounded balls and flattened them with the palm of my hand, then I took the back end of a paint brush and carved in the words LOVE. PEACE. and DREAM. Three of my most favorite words. ♥  I baked them in the oven for about 25 minutes at 350 degrees, then let them cool off for about an hour. (I got caught up doing other house work) I came back and painted them with my current favorite silver sparkly chrome colored acrylic paint and let the paint dry. After the paint dried, I used my hot glue gun and glued on some green ribbon as hangers. Then simple hung them on our tree. One thing I really love about these ornaments is that the possibilities are endless. You can make them say anything you want and they are so quick and easy to make! You could even use a type of homemade salt dough and I am sure it would work just as good!

Thursday, December 5, 2013

Our First House Key Ornament


We are obviously still living in our first house. We did have an apartment for a little while before we bought this house, however, this is our first HOME ♥ We we are planning on staying for at least a few years. I made up a batch of salt dough. (Recipe link is below) I love playing with clay and/or salt dough. I have been wanted to make a first house ornament for a little while now, and so I finally got around to it. I really tried to take a good picture of it, but I failed at that. It is silver and glittery in person, but my camera phone wouldn't pick up the sparkles. :( booo. Oh well. 

So, here is what I did. I made my salt dough (SO EASYY!!) I then rolled out a ball and flattened it. I used a straw to make a hole in the ornament for a ribbon to go through. Next, I took our key and pressed it into the dough. I took the key out and let it dry. After it dried out (I let it sit our for a few days) I painted it with one coat of sparkling silver and let that dry. Then I took black paint and painted our numbers on it. After that was dry I tied a green ribbon through the hole I made with the straw and hung it on our tree! 

YES IT REALLY WAS THAT EASY!!


Thursday, November 21, 2013

Happy Anniversary Mom & Dad!

My mom and dad are two of my biggest idols. They are a main part of my support team, my love and my happiness! They are the reason why I am who I am today. Anyways, I love them and so for their anniversary this year (32 years TODAY!) I painted them a red canvas to match their room décor,  and then I put an adorable love quote "Husband and Wife... Best Friends For Life" ahhhhhh I love it! I just used white scrapbooking stickers in two different fonts, and I also added a few rhinestones glued on random letters. I think it came out so adorable! And my parents really loved it! :) yay me! yay parents! yay love!


When I look at your relationship, I am in awe. I aim to make mine and James' relationship similar to yours because you guys are so in love and are such great role models for love, life, happiness, success and everything else!
 
Happy Anniversary Mom & Dad!
I love you both so much!
 
xoxo Renae

Wednesday, November 20, 2013

ABC book of us

For mine and James' 1 year wedding anniversary last month, I made him a fun ABC book. It is called "the ABC's of Us ♥" 

Ever since we started dating 10 years ago, I have always made him homemade gifts. Sometimes I only make him a homemade gift, sometimes I put them in with a present that I buy for him.
This time it was part of his whole gift, along with some other homemade pieces and it also included some purchased items. 

I saw this idea on Pinterest about a year ago, and fell in love with the idea!
Here is the original link I saw: I Love it All
So thank you to I love it all's blog for the wonderful Idea!

I took my time and came up with words, dates, memories or inside jokes for each letter of the alphabet.

It actually took longer than I originally thought it would, and that was just thinking up the words!

 I inclused a picture of us on each page, and I tried my best to match the pictures to the wording on that page.

I used scrapbook paper on black card stock, then bound them all together with a black bind.

Here is the cover page:


Here is the letter A:
I am not going to post a picture of each letter, just because that would be such a long post with only pictures and Id have to take a picture of each page! I just posted two letter to give you an idea.


Here is the letter N:
"No crosses. No creases" is an inside joke of our from when we were only 14 years old! :) 
It is one of the few inside jokes that is still used pretty frequently today between us!


James absolutely loved this homemade gift. It was like taking a trip down memory lane for the both of us! It took some time and a lot of thought to complete it, but the end result was so worth it! 

If you want to make one of these, or something similar, but need some letter ideas feel free to ask! And I will be more than happy to share!
I also believe you can purchase a similar book through the link I posted above!

Wednesday, November 13, 2013

Heart in the Clouds ♥

Hey look! Here is the blue canvas! :) 

I saw this online (don't remember where) (( I will try to find it again))
But when I saw it I thought of my friend Melissa! Just a few days ago at lunch she was telling me all about this quote and how much she loves it. So how could I not attempt to make this for her?!
I started off by doing 2 coats of the navy blue background on a white canvas and then after that dried (a few days later..) I used a white paint pen to write everything out and did 2 coats as well with the paint pen. 

QUICK REVIEW: the white paint pen is amazing! I bought it from Meijers just for this project and I am so excited to go out and purchase more colors because I absolutely fell in love with it! It came out so smooth, the color is strong, and it was so much easier to write with a paint pen vs a paint brush (which I am terrible at doing by the way!) 


I am fairly happy with how this turned out and I think she is going to love it! It is a little off-centered but that's part of homemade gifts... their never perfect to everyone's eye but they are perfect to the heart. <3 

Wow. Corny but true ;) 

After I gave it to her, she sent me a picture of it hanging in her room, which  made me even happier, because I was glad that she liked it!


Xoxo Renae

Tuesday, November 5, 2013

Grandmas Button Trees

My Uncle has been slowly sorting through all of my Grandmas things, and every once in a while he will give me a box of crafting stuff to take home. My most recent box was FULL of buttons! and I mean FULL! As soon as I got home I had to sit down and go through every single button, of course!

I had fun picking out a handful of my favorite buttons. While I was going through all of them, I really wanted to put some aside to craft with right away. To make something for my Uncle, as a way to thank him for giving me these things, and not just throwing them away! I also wanted to  make something for my momma, and my aunt to have another little piece of my grandma. So I did just that!

I put aside a few handfuls of fun mixtures of buttons and gathered some wire that I had in my craft room. I also had a few of the mini planting pots lying around! (and the gem stones too!) I started to wire the buttons, then twist all of the wires together to look like branches, I was originally going for a bouquet look, but discovered the tree form shortly into the start of this project.

After the wires were all twisted together, I thought they looked cool like roots and branches all twisted and tied together. I was happy with the turn out of it! That is when the potting and gem stones came into my mind. So I let my glue gun heat up and got to gluing! 

 I ended up making 4 button trees, one for my mom, my uncle, my aunt and myself. I had a blast making them as well! So easy and fun!

My Uncle, mom and Aunt just loved these thoughtful little gifts. I know they are not much but they mean something to us because they are made with my grandmas buttons.

A little piece of Grandma always and forever.


Wednesday, October 30, 2013

Stella & Dot ♥

I went to a trunk show last Friday, and it was a Stella & Dot party!
I fell in love! All of the pieces were just beautiful! Each item is unique!
The host was very friendly and defiantly knew how to accessorize everyone there with the perfect pieces to match their personalities!

My mom bought a bracelet - a gorgeous wrap bracelet! I got a scarf, and then there was a 50% off sale, so my momma bought me a purse! Gorgeous! 

So we ordered these items at the party on Friday (only 5 days ago) and yesterday (Tuesday) we received our items! Amazing service! and I am so in love with my new bag and scarf!

I ♥ Stella & Dot!


This scarf is called the Union Square Scarf - Mariposa


And my Momma got this beautiful Luna Wrap Bracelet

I hope to either go to another Stella & Dot party real soon, or have one of my own some day! 

♥ Renae

Friday, July 12, 2013

DIY *B*Dazzled Bowling Shoes (repost from old blog)

(click on the picture to enlarge it)

My family goes to a bowling event EVERY SINGLE YEAR. Usually I wear my bowling shoes that I spray painted GOLD and covered in SPARKLES. But this year, I was ready for a change. So I went to CVS (my addiction store) and I found these white cloth shoes for $5. I snatched them up right away and went home and got to work. I hand glued each rhinestone on one at a time. RED. YELLOW. GREEN. SILVER. It took me a long time, but I was super pleased with the end result. I also added a few scrapbooking stickers, PEACE and LOVE on the toes of each shoe as you can see. I just used Mod-Podge and coated the shoes, added the rhinestones, and then when they dried, I went over the shoes with two more coats of Mod-Podge

These shoes were a huge hit on bowling night! Everybody loved them and they got a ton of compliments! 

Although I don't wear them anywhere other than bowling too often, I think they still look awesome on my shoe rack! :)
They are defiantly my craziest shoes I own!

What are your craziest shoes?! 

xoxo Rayy
 
 
www.renaetrouse.blogspot.com is no longer my blog account. I am just reposting the posts on this blog so they dont get lost in the blog-sphere!