Showing posts with label quick. Show all posts

Friday, April 24, 2015

Baby Shower Thank Yous - DIY

UPDATE: Our Baby Shower was just perfect. It was so full of love and amazing people who love us and who we love. It was a beautiful shower, and I couldn't wait to write out the homemade thank yous and send them out!
 

Our shower is on a Saturday, so Sunday I am dedicating most of my day to making the Thank yous and writing them out, so I could mail them out on Monday. (EDIT: These thank-yous took me about 5 hours to make and write out, but they were so worth it and I loved how they turned out.)

The items I used were:
1 box of plain white invitations (100 count)
 fabric (I bought quarters from Joanne Fabrics - I used 10 different patterns)
buttons - (Joanne's and I used 5 different colors)
Our computer printer
hot glue gun and sticks
black sharpie
black thin sharpie
gluestick
scissors

I started off by using our computer and printer to print out THANK YOU on the upper right hand corner of each invitation. I used an invitation layout in Microsoft Word, and just made sure that my paper size matched the sizes on the computer printer setup page. I also used colored font to match what color fabric and buttons I was planning to use on certain thank-yous.

I ended up printing 10 yellows, 20 salmons, 20 pinks, 20 blues and 30 purples. (totaling 100 Thank-yous)

I then took my fabric scissors and cut out a temp-let shape of a baby buggy. You can even Google baby buggy to print out the ideal shape if you wanted to!

I cut out 10 buggy's of each fabric pattern that I purchased.
 

Once your buggy's are all cut out, now it is time to make the thank yous!
 

Step 1: use a glue stick to glue on the fabric buggy into the spot on the paper that you want it. I did all of mine close to the bottom left hand corner (as you can see)

Step 2: Use your regular black sharpie to draw a small handle on the buggy

Step 3: Use the same sharpie to draw two black lines coming out of the bottom of the fabric buggy

Step 4: Use a small dot of hot glue to attach the buttons to the bottom of the sharpie lines to look like wheels

Now keep repeating these steps until all of the cards are done!

That was so easy wasn't it!?

Here is a mash-up of one of each pattern and wheel color that I made.
I made a total of 100 thank yous in this style, I will then my thin black sharpie to write out my messages to all of our loving and wonderful family and friends.


This project would work for Thank-yous or even invitations! 

You could even use it for baby announcements once the sweet little one is born and you could add a newborn picture to it as well! 

There are so many fun ways to use this project, and the colors can be changed and played with as well!

If you make a version of these yourself, please share a picture of them in the comments below, or tag them on Instagram using #CreatingVirginiaAnne
I would love to see your creations!

Thursday, April 23, 2015

Tea Lights - Baby Shower Favor

 
"Light this candle, on the night
Once the stork has made his flight.
With a flicker of the flame,
Please say a prayer in Sweetpea's name."
For part of the baby shower gifts we will be giving each person a little baggy with a few items in it. One of those items will be a small tea light candle, with a tag attached that says the short poem that I started this post with.

I wanted to make the tea lights a little more fun, girly and cute.
So I took different pink washi tapes that I had, and cut them to size.
I wrapped each tea light (whew I wrapped 100!) and I really think it made them a little more fun for the favor bags. 


This quick, easy and cheap DIY was just that. It was very quick, it took me less than 1 minute per tea light. It was easy, all I had to do was measure, cut and wrap. It was also cheap, the candles were from Walmart but you can buy them from the Dollar Tree as well. The washi tape was off brand and from the Dollar Tree, and that is all you need my friends!

If you make your own version of these fun tea lights, please share a picture of them in the comments below, or tag them on Instagram using #CreatingVirginiaAnne   

I would love to see your creations! 

Wednesday, December 24, 2014

EASY & CHEAP Pooping Reindeer Ugly Christmas Sweaters - DIY

Every year for Christmas my brothers and our significant others have a lotto party night, where we buy scratch off tickets instead of buy each other  presents. This year we decided to make it an UGLY SWEATER PARTY as well! EEkkk! As soon as we decided that I was overly excited to make a fun set of sweaters for the hubby and I to wear!

Things you need:
Sweaters
felt (colors listed below)
tulle
present bows
hot glue gun or fabric glue
scissors
marker to trace with
 
I started off by buying different colors of felt.
The colors I used are:
tan
cream
red
black
white

You need the most of the tan for the body of the deer,
You also need a good chunk of cream felt to use for the antlers.

I laid out the felt and drew on my reindeer.
I then cut it out and pieced him together.

I traced the hubby's hands on the tan, then my hands on the cream felt, so that the cream antlers were smaller than the tan antlers.

I also cut out a red oval for the reindeer nose!

 
I then laid out our two white sweaters that I bought for $5 each at WalMart.
I measured the height difference between my hubby and I, so that when we stood next to one another our reindeer matched up.

I plugged in my hot glue gun and let it heat up!

Then I got to gluing!


For the eyes, I cut out white felt and black rectangles to make the pupils.
I then used some black felt for the reindeer feet, and I took white tulle and bunched it up along the bottom of the sweaters, under the reindeer feet, to make it look like snow. I used hot glue for all of it and it help on very well!

The next step is applying the present bows!
I used 8 bows total.
I glued two bows falling from the reindeer's rear end.
and then I piled on the remaining 6 bows just above the tulle (which is acting as the snow)
The picture below shows that!


Our sweaters were a HUGE hit at the party! and people were even asking us if they could borow them! Which of course they can!

I paired my sweater with my long Santa hat, my red leggings, my stripped Christmas stockings that go above the knee, and my reindeer slippers that I absolutely adore!
The only downside is, I didn't want to take the chances to put it in the washing machine.. so I hand washed them, just to be safe.  

If you make your own version of this Ugly Christmas Sweater be sure to share it in the comments below, or tag #CVA on Instagram! I would love to see your creations! Even if you don't make this version, if this post even inspired you to create your own Ugly Sweater please share it too!

Saturday, December 20, 2014

Mom's Christmas Place Mats - DIY

 
I helped my mom make these adorable Christmas themed place mats with my nephew today! They were quick, easy and fun for all of us!

The items you need are:
Place mats (a lighter color works best)
Brown paint
Green paint
Red paint
Black sharpie or black paint
Red Sharpie (optional)
A hand and a foot!

First, you take the place mat, and lay them out. Paint the foot being used green, and place it towards the bottom left corner. Then take the hand being used, paint it brown and place it just above and to the right of the foot print. Then repeat that step two more times. (Or even more if you'd like!)

Next, take the red paint and just use a small amount. Dip in a thumb and a finger tip to make the Santa in the sleigh! Let the paint dry.

After the paint is dry, we then used a black sharpie to draw in the detailing of the sleigh and reindeer. Ropes, antlers, the bottom of the sleigh, and of course Santa's face!

My mom used a red sharpie to write Merry Christmas, however you can also use some red paint if you want to! When it was all done she wrote his name and the year on it, so that they will remember forever.
  

My momma made these as a surprise gift for my nephews parents. This is a fun project to do with kids of all ages! It is also a great way to watch the kids hands and feet grow over the years!

If you make a Christmas place mat of your own please remember to share them in the comments below or even tag #CVA on Instagram! I would love to see your creations! 

Sunday, November 2, 2014

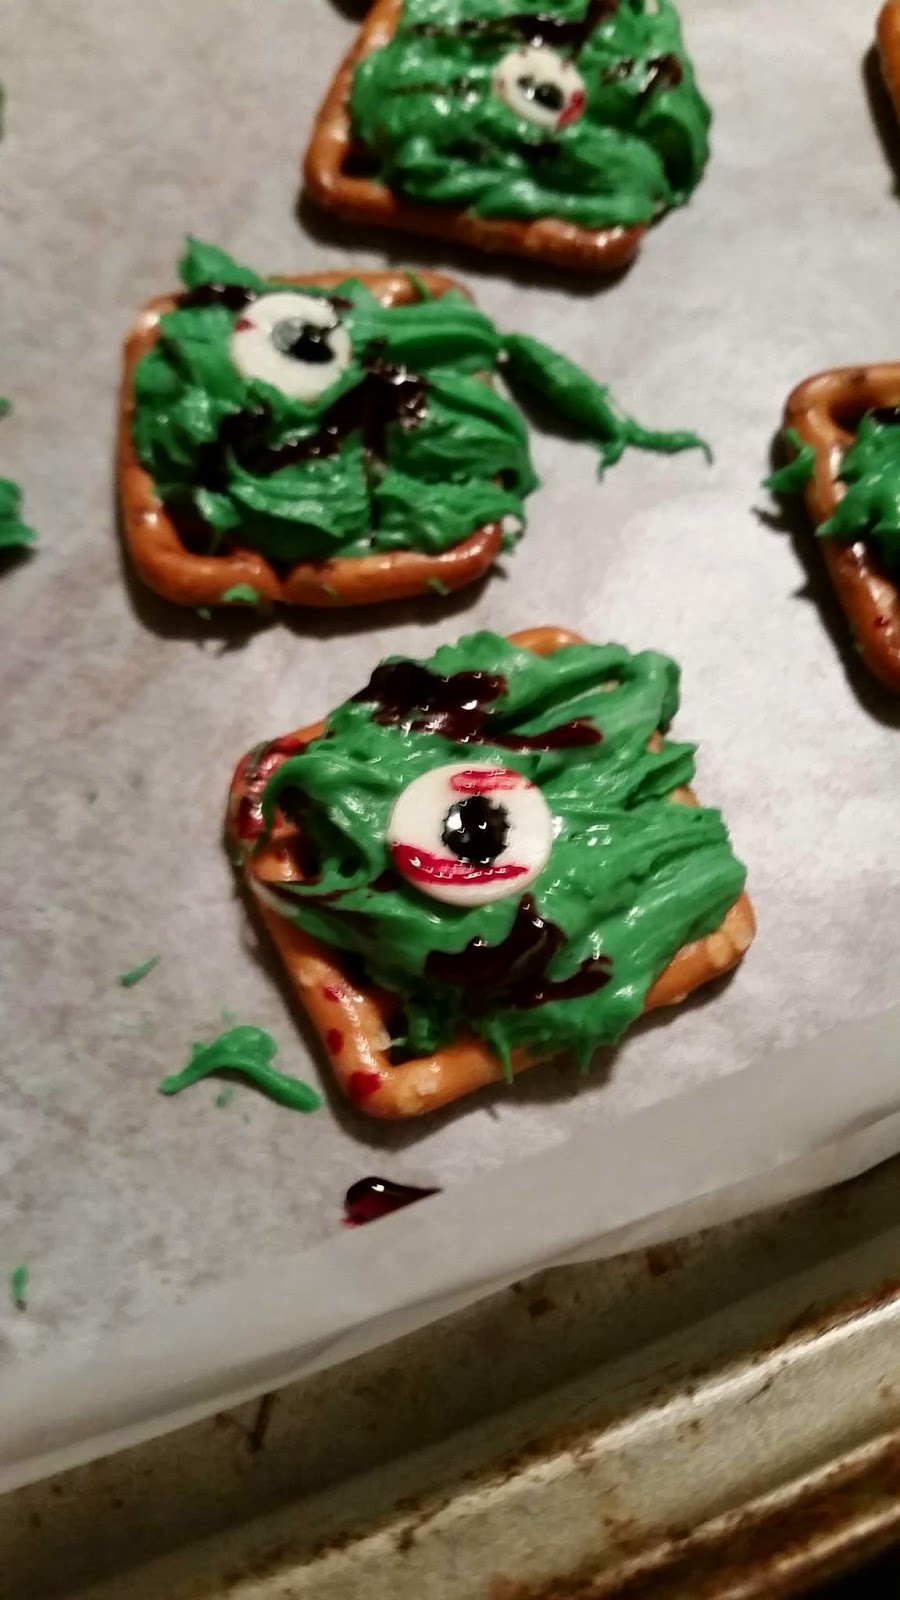
Zombie Bites! A snack for The Walking Dead fans!

Are you a fan of The Walking Dead?! 
Here is a fun snack to make for Sunday night!
ZOMBIE BITES!


You will need: 
White chocolate baking chips
Waffle Style pretzels
Sugar bones (I found my in the Halloween cake items)
Food coloring (I used red, black and green)
 

Other items I used:
mixing bowls
mixing utensils (I used a fork)
toothpicks
cookie sheets
wax paper
microwave

Step 1: Separate a bag of white chocolate baking chips into two bowls (make sure the bowls are microwave safe!)

 
Follow the directions on the chocolate chips package, for timing on how to melt the chocolate without burning it. 

Step 2: while the chocolate is melting away in the microwave, I laid out my pretzels on a cookie sheet covered with wax paper (I prefer it for an easier clean up!)
 
 Step 3: When the chocolate is melted, I added the food coloring. Green to one bowl and red to the other bowl. 


Step 4: I mixed the food coloring in very well, and kept adding more until the chocolate was my desired shades of green and red. When the chocolate was my desired colors, I used my fork to drop a blob onto each pretzel. I started with the green chocolate.


Step 6: before the green chocolate started to harden, I placed an un-melted white chocolate chip upside-down in random places of the green chocolate.  I then took red food coloring on a toothpick and dribbled red over the entire pretzel and chocolate to make it look like blood. I added a small dab of black food coloring to the center of the un-melted white chocolate chip to make it look like an eyeball. 


Step 7: Now onto the red melted chocolate! I did the same process as step 6 for the red as well, but I also used some candy sugar bones for some of them! I also didn't use any extra red food coloring to add blood to these ones, but you totally could if you wanted to! I did however, use a fork to rough up the chocolate a little more on these ones as the chocolate was starting to harden. I was going for more of a human look for these ones, compared to the green ones.


Step 8: place them in the fridge until it is serving time!

Step 9: Take them out of the fridge and enjoy them with other Walking Dead fans and friends!

p.s. these would also be a fun Halloween treat as well!! Heck, even for a scary movie night with friends or the family!

If you recreate these or even make your own version please remember to share a picture with me and your thoughts on them in the comments below! Or tag #CVA on Instagram! I could love to see your creations! 

Thursday, October 30, 2014

Memory Bangles - DIY + So EASY!

I took some scraps to make my sister-in-law a flower canvas out of her late grandmothers clothes, as a memory piece, that you can see here.

Well I still have some scraps left over, so I am going to continue to use them for her, and not let any of the fabric go to waste.

I made 3 of these fun and easy Memory Bangles for her.


I bought 3 plastic bangle bracelets from the Dollar Tree.
(yep! Just $3!)


I cut the scraps into strips, I really just made sure the edges were nice and clean.


I then, took my hot glue gun and put a dot of glue to start of the first strip of fabric and wrapped the fabric piece around the bracelet. I also used a dot of hot glue to hold the end of the strip to the bracelet as well.
I just kept repeating this until the bracelets were completely covered!


 She absolutely loved them, and even though they are not bracelets made to wear with an outfit everyday, they are nice to have because it is a piece of her grandmother that she can keep forever.

If you make a version of these, please share a picture in the comments below, or tag them on Instagram using #CreatingVirginiaAnne

I would love to see your creations!

Sunday, August 31, 2014

DIY Light House Bird Feeder

My Grandma loves light houses.
I am always trying to think of and find light house craft ideas.
Well here is an easy one!

Here is what I bought:
- red spray paint (not pictured)
- white spray paint (not pictured)
-3 different size pots
- 1 small pot tray
- super glue
- E6000 glue
- cream colored multi-purpose rope
- black crafting paint
- 1 bird seed bell


I placed all 3 pots and the 1 pot trey on a piece of scrap board from our storage shed. 
 

I then sprayed each of them white with my white spray paint.
(I didn't worry about the tops because you won't be seeing them; why waste paint right?!)
 

After the white paint was dry, I took Frog painters tape and taped off a strip around the rim edge of each pot. 
 

I then took my red spray paint and sprayed the entire rim of each pot.
(NOTE: I had to use a piece of paper to shield the white paint, you don't want red speckles! But maybe you do, so if you do, more power to ya!)

Oh, I also painted the bottom of the small pot tray red.
 

When the red paint was finished drying.
I took more Frog painters tape, and made window shapes on each of the pots. 
 

 I then took my black crafting paint, and painted the window holes.
I let that paint dry completely, and then I slowly took off all of the Frog painters tape.
 

You're almost done!

The next step is to stack the pots on top of one another.
I used E6000 glue (clear) to attached the small pot tray to the smallest painted pot I have. 
(I did not glue them together because I figured it would be easier to store it in the winter months if it can be taken apart.)

Now, take your rope and wrap a piece around each pot, at the lip of the pot and the top edge of the red paint. 
I measured each piece of rope, then glued it using E6000 glue.
I then took super glue and squeezed some in the crease between the pot and the rope to make it more sturdy.

The last part it, place it where you want it, and place your birdseed bell on top!
TAH-DAH!
  
Now you have a beautiful light house bird feeder!
 

Friday, July 11, 2014

Delicious Bonfire Desserts

We have a lot of bonfires. A LOT. 
I love s'mores... but I don't always want to abandon my new healthy lifestyle to indulge in some melted chocolate, gooey marshmallow, surrounded by gram-cracker calorie bandit! I have been eating these bonfire pies since I was a little kid, but they were never this healthy.

Here is what you need & what you do:


Start off with 2 pieces of whole wheat bread


Coat one side of each piece of bread with fat free cream cheese and center a couple of strawberries in the middle.


Using a campfire cooker and a campfire, place your cream cheese and strawberry sandwich in the cooker, and pull off the crust. 


 Cook it over the fire, until it is toasted & somewhat crispy.
 

Then chow down and enjoy your healthy bonfire snack!
They are easy, cheap & delicious

Monday, February 3, 2014

uiltfree Dessert

 I actually made these desserts for Superbowl... but then the idea popped into my head... VALENTINES DAY! This is a great way to enjoy a nice and pretty dessert on Valentines day with the ones you love! And it is so quick and simple!

All it is is fresh fruit, bananas, blueberries, raspberries, blackberries, and strawberries; with light and low fat chocolate syrup drizzled over it!

I sometimes take it an extra step and top it with light whipped cream!
mmmmm...

My mouth is watering just thinking about it!

There are so many ways you can present this dessert also, it was just an at home dessert for us and Brian this time so I just used a normal clear drinking glass. However, you could use a pretty plate or fun martini glass or something else creative!

Just have fun with it and enjoy your Guiltless Valentines Dessert! 


Wednesday, November 13, 2013

Heart in the Clouds ♥

Hey look! Here is the blue canvas! :) 

I saw this online (don't remember where) (( I will try to find it again))
But when I saw it I thought of my friend Melissa! Just a few days ago at lunch she was telling me all about this quote and how much she loves it. So how could I not attempt to make this for her?!
I started off by doing 2 coats of the navy blue background on a white canvas and then after that dried (a few days later..) I used a white paint pen to write everything out and did 2 coats as well with the paint pen. 

QUICK REVIEW: the white paint pen is amazing! I bought it from Meijers just for this project and I am so excited to go out and purchase more colors because I absolutely fell in love with it! It came out so smooth, the color is strong, and it was so much easier to write with a paint pen vs a paint brush (which I am terrible at doing by the way!) 


I am fairly happy with how this turned out and I think she is going to love it! It is a little off-centered but that's part of homemade gifts... their never perfect to everyone's eye but they are perfect to the heart. <3 

Wow. Corny but true ;) 

After I gave it to her, she sent me a picture of it hanging in her room, which  made me even happier, because I was glad that she liked it!


Xoxo Renae

Wednesday, November 6, 2013

I have an Arm Knitting OBSESSION!


I am officially OBSESSED with arm knitting! I went to Joanne Fabrics on Tuesday night with my momma, + bought a TON of new yarn!
 

Yeah. Yeah. Yeah.
Okay. So I went a little crazy. 
I couldn't help myself! 
I picked out so many fun colors + combinations! 
I just couldn't wait to get home from YOGA + arm knit all night long!
(which is what I did)

Here are some of the fun colors + combos I put together. 


I have been making at least 3-5 a night.
Stocking up + also already giving them away!
I have given my mom 2 already, + walked her through making her own!
I gave my Aunt Vickie one for her birthday, Allison one for her birthday, Chelsea one, Lauren one, Melissa one, Molly one + I have 4 to myself. The rest are stock.

♥ ARM KNITTING WITH MY MOMMA ♥
I went to my parents house tonight to visit, while James was working a few doors down.
I brought some yarn + taught my momma how to arm knit!
She is so crafty! So of course she did an amazing job!
She made herself a beautiful red tone / maroon colored scarf!
It was fun to craft with my mom, + to teach her something for once!
(shes always teaching me things)

To end this post, here is a picture of two of my favorite scarves that I am keeping for myself. 
The purple + blue + green is so bright + fun! I love fun colors!
The peach toned scarf is fluffier + such a fun neutral color that you can wear with pretty much anything!